Today we posted a guide on how to configure your iPhone/iPad with Zimbra. This guide will give you steps on how to configure the native app of your iOS device.
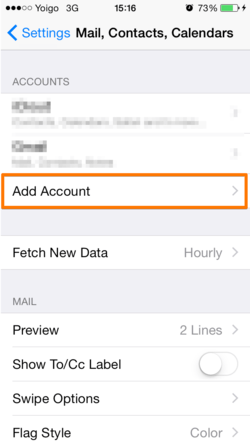
1. On the Home screen of iPhone/iPad click the Settings icon (the gear icon).


2. Select Add Account
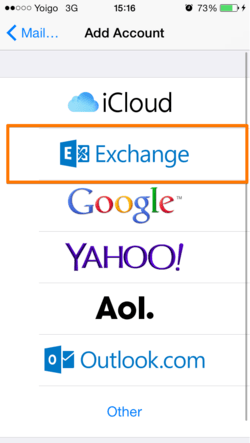
3. Now choose Exchange
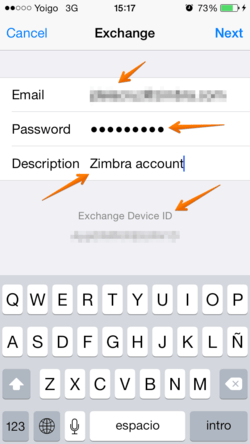
4. Enter the information of your account
- Email: Here you enter your e-mail, for example user@ilger.com
- Password: Here you enter the password of the email that you have just entered
- Description: Here you enter an account description and you can enter anything you want
Now you can click on Login
Note: if the auto-detection of the server doesn’t work, will open a screen where you must enter the following parameters:
- Email: Here you enter your e-mail, for example user@ilger.com
- Server: Here you enter the name of your server that will mail.dominio.com
- Dominio: Here you have to leave it blank
- Nome utente: Here you enter your e-mail, for example user@ilger.com
- Password: Here you enter the password of the email that you have just entered
- Descrizione: Here you enter an account description and you can enter anything you want
5. Here you can select to synchronize Mail, Contacts, Calendars and Reminders
If you already have contacts, a window will appear asking if you want to keep your existing contacts on your iPhone. If you choose to keep it it is possible that you will see duplicate entries but we still recommend that you keep them in order to avoid loss of contact.
6. Click on Save and right now your Zimbra account is configured and synchronized.
Other settings:
Change the synchronization settings of the account
Clicking on the account that you just created, below you can choose how long to synchronize email and you can also set an automatic reply.
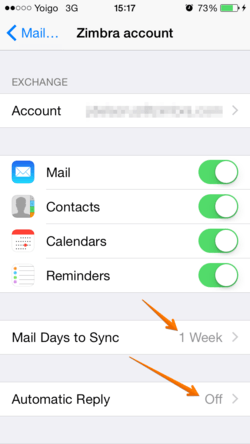
Important: Please note that by default you will have to choose between 1 day, 3 days, 1 week, 2 weeks or 1 month.
For the WITHOUT LIMITS SYNCHRONIAZTION, write with the request to supporto@ilger.com.
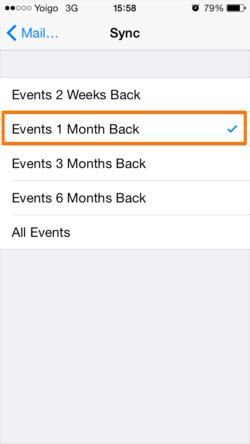
Going to Settings → Mail, contacts, calendars, scroll to the bottom where you will find a Calendars menu and among to the entries in this menu you will find Sync.
From there you can decide how long you want to synchronize your calendars.